الأربعاء، 28 سبتمبر 2011

How to Restore Windows XP to a Previous State

Using System Restore to Restore Windows XP

If Windows XP does not start
  1. Start the computer and then press the F8 key when Windows begins to start. The Windows Advanced Options menu appears.
  2. Use the ARROW keys to select Last Known Good Configuration (your most recent settings that worked), and then press ENTER.
  3. If a boot menu appears, use the ARROW keys to select Microsoft Windows XP, and then press ENTER. Windows XP restores the computer to the most recent restore point.
If Windows XP does start
  1. Log on to Windows as Administrator.
  2. Click Start, point to All Programs, point to Accessories, point to System Tools, and then click System Restore. System Restore starts.
  3. On the Welcome to System Restore page, click Restore my computer to an earlier time (if it is not already selected), and then click Next.
    Welcome to System Restore
    Figure 1. Welcome to System Restore
  4. On the Select a Restore Point page, click the most recent system checkpoint in the On this list, click a restore point list, and then click Next. A System Restore message may appear that lists configuration changes that System Restore will make. Click OK.
    Select a Restore Point
    Figure 2. Select a Restore Point
  5. On the Confirm Restore Point Selection page, click Next. System Restore restores the previous Windows XP configuration, and then restarts the computer.
  6. Log on to the computer as Administrator. The System Restore Restoration Complete page appears.
  7. Click OK.
Top of page

Troubleshooting

You may inadvertently restore Windows XP to a previous configuration that you do not want.
To undo the restoration
  1. Log on to Windows as Administrator.
  2. Click Start, point to All Programs, point to Accessories, point to System Tools, and then click System Restore. System Restore starts.
  3. On the Welcome to System Restore page, click Undo my last restoration, and then click Next. A System Restore message may appear that lists configuration changes that System Restore will make. Click OK.
  4. On the Confirm Restoration Undo page, click Next. System Restore restores the original Windows XP configuration, and then restarts the computer.
  5. Log on to the computer as Administrator. The System Restore Undo Complete page appears.
  6. Click OK.

How to Roll Back a Device Driver, for the IT Pro

Driver Rollback helps ensure system stability. When you update a driver, a copy of the previous driver package is automatically saved in a special subdirectory of the system files (for every driver that you back up, a new value is added to the Backup keys located in the appropriate section of the registry).
If the new driver does not work properly, you can restore the previous driver by accessing the Driver tab for the device in the Device Manager, and clicking Roll Back Driver.
Driver Rollback permits only one level of rollback (only one prior driver version can be saved at a time); this feature is available for all device classes, except printers.
To roll back a driver
  1. Login as Administrator and access the Device Manager: Click Start, and then click Control Panel. Click Performance and Maintenance, and then click System. On the Hardware tab, click Device Manager.
  2. Navigate to the driver you wish to roll back, right click the name of the driver and choose Properties, as shown in Figure 1 below.
    Choosing a driver to roll back
    Figure 1. Choosing a driver to roll back
  3. Click the Driver tab and then click Roll Back Driver, as shown in Figure 2 below.
    Rolling back a driver

Software Installation and Maintenance Scenarios

Scenarios Covered in this Document

This guide covers a few basic scenarios for Software Installation and Maintenance, including:
  • Assigning repackaged Microsoft Word 97 (to users).
  • Publishing Microsoft Excel 97 (using a .zap file).
  • Removing Excel 97.
  • Upgrading Word 97 to Microsoft Office 2000 (using an Office 2000 transform).
  • Assigning Windows 2000 to a computer (a new build).
As the packages for these applications are not included, you may have to modify the step-by-step guide. You may use applications that either natively support the Windows Installer or that you have repackaged for the Windows Installer.
Please note that this guide does not describe all of the possible Software Installation and Maintenance scenarios. You should use this guide to gain an understanding of Software Installation and Maintenance. Then think about how your organization might use software installation and the other IntelliMirror features to reduce TCO.
Note: If you completed the Group Policy step-by-step guide, it may be necessary to undo some of the Group Policy to complete this guide. For example, the Loopback policy disables the ability to access the Add/Remove Programs in the Control Panel.

Assigning Repackaged Word

Whether publishing or assigning software, the basic steps are fundamentally the same. This guide presents a scenario for assigning a repackaged version of Microsoft Word 97 for users.
This procedure assumes that you have already created a Word97 folder in the software distribution point created earlier, and that you are using a repackaged version of Microsoft Word 97.
Note: To assign to users, start in the Group Policy snap-in User Configuration node. To assign to computers, start in the Computer Configuration node.
To assign repackaged Word or other software:
  1. Log on to the HQ-RES-DC-01 server as an administrator.
  2. Click Start, point to Programs, click Administrative Tools, and then click SIM Tool.
  3. In the SIM Tool console, double-click Active Directory Users and Computers, double-click reskit.com, and then double-click Accounts.
  4. Right-click Headquarters, and select Properties from the context menu. In the Headquarters Properties dialog box, click the Group Policy tab. Right-click HQ Policy in the Group Policy Object Links list box, and click Edit to open the Group Policy snap-in.
  5. In the Group Policy snap-in, under User Configuration, double-click Software Settings, right-click Software installation, and then select New from the context menu. Click Package.
  6. In the Open dialog box, click the Word97 folder.
  7. You need to substitute the folder for the software you are going to deploy, from the software distribution point you created earlier.
  8. Click Open. Click Word, and click Open. In the Deploy Software dialog, click Assigned, and then click OK.
Note: If you are going to deploy a Windows Installer package with a transform, you have to select Configure package properties in the Deploy Software dialog so that you can associate the transform with the package. Make any other changes to the properties at this point, before you press OK to either assign or publish the software.
The application is added to the Software Installation snap-in as assigned. After the application is assigned, you can right-click the application entry in the details pane to view the assigned applications property pages.
The application is assigned to all the users managed by the Headquarters GPO.
Verifying the Effect of Assigning Word
To verify the effect of assigning Word 97 to the Headquarters GPO, you can log on to Windows 2000 Professional as a user who is managed by the Headquarters OU. (If you are using the common infrastructure, you could log on to the client as elizabeth@reskit.com, for example.)
When you log on to Windows 2000 Professional, you should see a Microsoft Word icon on the Start menu.
If you select Word, the Windows Installer installs Word for you. While the installation is proceeding, you should see a progress indicator from the Windows Installer. When the installation is complete, Word starts and you can edit a document.
If the software installation becomes damaged, then the next time the user selects Word from the Start menu, if all the key files as defined in the Windows Installer package for Word are present, Word starts. If a key file is missing or damaged, the Windows Installer repairs Word and then starts it.

Publishing Legacy Excel

To publish Excel 97 without repackaging it for the Windows Installer, you must first create a .zap file for Excel. Use the .zap file example in the appendix as a model. You also need to create a folder for Excel97 in the software distribution point you created earlier.
Open the Software Installation snap-in saved previously, and edit the Headquarters GPO. (See the steps in the preceding section.) When you are ready to publish Excel 97, the snap-in should look like it did when you assigned Word 97 in the previous section.
To publish Excel:
  1. In the SIM Tool console, double-click Active Directory Users and Computers, double-click reskit.com, and then double-click Accounts.
  2. Right-click Headquarters, and click Properties.
  3. In the Headquarters Properties dialog box, click the Group Policy tab, click the HQ Policy GPO, and then click Edit to open the Group Policy snap-in.
    In the Group Policy snap-in console tree, under User Configuration, double-click Software Settings, right-click Software installation, and then select New from the context menu. Click Package.
  4. In the Open dialog box, click the Excel97 folder, and click Open.
    In the Files of type combo box, click the down arrow, and then click ZAW Down-level applications package (*.zap). Click Excel97, and click Open.
  5. In the Deploy Software dialog box, the Publish option is already selected, click OK.
Excel 97 is published to the users managed by the Headquarters GPO.
Because a ZAP file publishes the existing Setup, the Setup will not run with elevated privileges. Therefore, you will need to supply administrative privileges during the Setup. This can be done by using the Install Program as Other User dialog box. Accessing this dialog is controlled by policy. A policy called Request credentials for network installations is available in the Group Policy snap-in, under User Configuration\Administrative Templates\Windows Components\Windows Explorer. If enabled, this policy displays the Install Program As Other User dialog box even when a program is being installed from files on a network computer across a local area network. For more information, see the Explain tab on this policy property page.
To set the Request Credentials for network installations policy:
  1. In the SIM Tool console, navigate to the Headquarters OU, and then right-click Headquarters and click Properties.
  2. In the Headquarters Properties dialog box, double-click the HQ Policy GPO to open the Group Policy snap-in.
  3. In the Group Policy snap-in, under User Configuration, click the + next to Administrative Templates.
  4. In the Request credentials for network installations dialog box, click Enabled, and click OK. Close the Group Policy snap-in
    In the Headquarters Properties dialog box, click OK.
  5. In the SIM Tool console, click Save on the Console menu. Click Exit on the Console menu.
Verifying the Effects of Publishing Excel 97
To verify the effect of publishing Excel 97 to the Headquarters GPO, first log on to Windows 2000 Professional as a user who is managed by the Headquarters OU. (If you are using the common infrastructure, you could log on as elizabeth@reskit.com, for example.)
To confirm the effects of publishing Excel 97:
  1. Click Start, point to Settings, click Control Panel, and then double-click Add/Remove Programs.
  2. In the Add/Remove Programs dialog box shown in Figure 4 below, click Add New Programs.
    Note: Word 97, which was assigned, is listed in the Add/Remove Programs dialog box. This is so that users can add or remove the assigned program if they need to. Even if a user removes the assigned application, it is available for installation again the next time the user logs on.
    Bb742421.instma04(en-us,TechNet.10).gif
    Figure 4: Add/Remove Excel 97
  3. Select Microsoft Excel 97 from the Add programs from your network list, and click Add.
    You should see the Install Program As Other User dialog box shown in Figure 5 below because you are installing a non-Windows Installer based application.
    Bb742421.instma05(en-us,TechNet.10).gif
    Figure 5: Install Program as Other User
  4. In the Install Program As Other User dialog box, click Run the program as the following user, type Administrator in the User Name text box, and type the domain name (reskit) in the Domain box. If you have an Administrator password set for this computer, you must enter this as well.
  5. Click OK.
    Excel now installs using the original Setup program. You should follow the instructions in the original Setup UI to complete the installation. After you have installed Excel, you can close the application.
  6. Close Add/Remove Programs, and then close Control Panel.
  7. Log off Windows 2000 Professional.
To remove Excel 97:
  1. In the SIM Tool console, double-click Active Directory Users and Computers, double-click reskit.com, and then double-click Accounts.
  2. Right-click Headquarters, and click Properties.
  3. In the Headquarters Properties dialog box, click the Group Policy tab, click the HQ Policy GPO, and then click Edit to open the Group Policy snap-in.
  4. In the details pane, right-click Microsoft Excel 97, and select All Tasks from the context menu.
  5. Click Remove.
  6. In the Remove Package dialog box, click Yes.
    Note: Because Excel 97 was installed using a .zap file, you do not have the option to force the removal as you would with a Windows Installer file.
    Microsoft Excel 97 no longer appears in the details pane.
  7. Log on to the Windows 2000 Professional as the Local Administrator (remember, Excel was installed as Administrator in the preceding scenario).
  8. Click Start, point to Settings, click Control Panel, and then double-click Add/Remove Programs.
  9. In the Add/Remove Programs dialog box, click the Microsoft Excel 97 entry in the Change or Remove Programs frame, and then click Change/Remove.
  10. The Excel 97 Setup program starts. In the Microsoft Excel 97 Setup dialog box, click Remove All.
  11. When Setup prompts you about removing Microsoft Excel 97, click Yes. Click OK.
  12. Close Add/Remove Programs, and then close Control Panel. Log off Windows 2000 Professional.

Upgrade Microsoft Word 97 to Office 2000 With a Transform

Office 2000 comes with a Windows Installer package natively authored. Before performing this upgrade, use the Office 2000 Customization Wizard to create a transform. You must substitute the name of your transform in this scenario.
This procedure assumes that you have placed the necessary files (.msi, .mst, and so on) in a folder called Office in the software distribution point.
To upgrade Word 97 to Office 2000
  1. In the SIM Tool console, double-click Active Directory Users and Computers, double-click reskit.com, and then double-click Accounts.
  2. Right-click Headquarters, and click Properties.
  3. In the Headquarters Properties dialog box, click the Group Policy tab, click the HQ Policy GPO, and then click Edit to open the Group Policy snap-in.
  4. In the Group Policy snap-in, under User Configuration, double-click Software Settings, right-click Software installation, click New, and then click Package.
  5. In the Open dialog box, click the Office folder, and click Open. Select the Office 2000 Windows Installer package (data1.msi), and click Open.
  6. In the Deploy Software dialog box, click Advanced published or assigned, and click OK.
  7. In the Microsoft Office 2000 Properties dialog box, click the Modifications tab, and click Add.
  8. In the Open dialog box, click Office, and then click Open. Select the Office 2000 transform (.mst), and click Open.
    Note: It is important that you do not click OK until you have set all the options for the modifications.
  9. In the Microsoft Office 2000 Properties dialog box, click the Upgrades tab, and click Add.
  10. In the Add Upgrade Package dialog box, Microsoft Word 97 should be highlighted in the Package to Upgrade list box. If not, click it to select it. Click Uninstall the existing package, then install the upgrade package, and then click OK.
  11. In the Microsoft Office 2000 Properties dialog box, click the Required Upgrade for existing packages checkbox. Do not click OK yet.
  12. In the Microsoft Office 2000 Properties dialog box, click the Deployment tab, click Assigned in the Deployment type field, and accept the default option (Basic) in the Installation user interface options field.
    Review all the tabs to make sure you have edited all the properties and you are ready to assign the upgrade. Click OK.
Office 2000 with the transform is added to the Software Installation snap-in. The snap-in should now show Office 2000 as assigned, and it should show an upgrade relationship between Word 97 and Office 2000.
At this point, if you log on to Windows 2000 as a user in the HQ Policy GPO, you should see Word 97 being removed, the start of the upgrade. When you select any of the Office icons from the Start menu, you install Office 2000 to complete the upgrade.

Assigning Windows 2000 to a Computer Upgrading Windows 2000

You can upgrade Windows 2000 to the release version.
Note: The operating system build being upgraded must be older than the build you are upgrading to.
If you completed the Group Policy guide before this, you may have turned off applying Group Policy to computers. If this is the case, you need to change this before this Software Installation policy can be applied on the computers.
In this scenario, you assign the upgrade of Windows 2000 to computers managed by a policy created for the Desktops OU under Resources. You could just as easily publish it for users.
The RES-WKS-01 computer should be in the Desktops OU. If it is not, you need to move it to one of the OUs under the Resources OU. You can move the computer by highlighting it in the details pane of the Active Directory Users and Computers Snap-in and then selecting Move from the context menu.
Note: To deploy the Winnt32.msi package, you need to modify the Unattend.txt file to include the Windows 2000 CD key information. Otherwise, the Setup program would ask for this information in a non-interactive desktop and wait indefinitely.
  1. Open the SIM Tool console you created earlier.
  2. Double-click Active Directory Users and Computers, double-click reskit.com, and then double-click Resources.
  3. Right-click Desktops, and click Properties.
  4. Click the Group Policy tab, click New, and type Desktop OS Upgrades. Press Enter. Click Edit.
  5. In the Group Policy snap-in, under Computer Configuration, double-click Software Settings.
  6. Right-click Software installation, click New, and then click Package.
  7. Browse to the network to the software distribution point that has the Windows 2000 files.
    Note: You may want to place the Windows 2000 CD in the CD drive of the server, and share the CD-ROM drive as the software distribution point for these files. This saves having to copy all the files to the software distribution point, although if the CD-ROM drive is not fast, the install may take longer.
  8. Click the i386 folder, click Open, click WINNT32 (.msi file), and then click Open.
  9. In the Deploy Software dialog box, the Assigned option on the Deploy Software dialog box is already selected. Click OK.
  10. Close the Group Policy snap-in, then in the Desktop Properties dialog box, click Close in the Group Policy page.
  11. In the SIM Tool console, click Save on the Console menu, and then click Exit on the Console menu.
At this point you should restart the RES-WKS-01 computer. When you do, the normal shutdown and startup messages are displayed.
Eventually, in the Windows 2000 Professional startup dialogs you should see the following messages:
Applying Software Installation settings…
Followed by:
Windows Installer installing managed software Windows 2000 Professional…
The computer restarts and continues the upgrade.

Important Notes

The example company, organization, products, people, and events depicted in these guides are fictitious. No association with any real company, organization, product, person, or event is intended or should be inferred.
This common infrastructure is designed for use on a private network. The fictitious company name and DNS name used in the common infrastructure are not registered for use on the Internet. Please do not use this name on a public network or Internet.
The Microsoft Active Directory™ structure for this common infrastructure is designed to show how Microsoft Windows 2000 Change and Configuration Management works and functions with the Active Directory. It was not designed as a model for configuring an Active Directory for any organization—for such information see the Active Directory documentation.

Creating a Software Installation Snap-in Tool

Creating a Software Installation Snap-in Tool

To create the Software Installation snap-in:
  1. Log on to the HQ-RES-DC-01 server as an administrator.
  2. Click Start, click Run, type mmc, and then click OK.
  3. In the MMC console, click Add/Remove Snap-in on the Console menu.
  4. In the Add/Remove Snap-in dialog box, click Add.
  5. In the Add Stand-alone Snap-in dialog box, click Active Directory Users and Computers on the Available Standalone Snap-ins list, and then click Add. Click Close, then click OK.
  6. In the console tree, double-click Active Directory Users and Computers to expand the tree, double-click the reskit.com domain, double-click the Accounts organizational unit (OU).
  7. Click the + next to the Headquarters OU.

Saving the Software Installation Snap-in Tool

As you go through this guide, you may want to save changes to the MMC console.
To save your changes:
  1. In the MMC console, click Save on the Console menu.
  2. In the Save dialog box, type SIM Tool in the File name text box, and then click Save.
Your snap-in will look similar to Figure 1 below.
Bb742421.instma01(en-us,TechNet.10).gif
Figure 1: Software Installation Snap-In

Creating a Group Policy Object

If you have already completed the Group Policy step-by-step guide, then you may have already created the necessary Group Policy objects (GPOs).
To create a Group Policy Object (GPO):
  1. In the Software Installation snap-in tool you just saved (SIM Tool console), in the console tree, double-click Active Directory Users and Computers, double-click reskit.com, and then double-click Accounts.
  2. Right-click Headquarters, and select Properties from the context menu.
  3. In the Headquarters Properties dialog box, click the Group Policy tab, and then click New.
  4. Type HQ Policy.
    This creates a new Group Policy object called HQ Policy.
    At this point, you could add another GPO—giving each one that you create a meaningful name—or you could choose to edit a GPO, which starts the Group Policy and Software Installation snap-ins. If you have more than one GPO associated with an Active Directory folder, verify the order; a GPO that is higher in the list is processed first.
  5. Click Close.
Best Practice Consider using security descriptors (DACLs) on the GPO to increase the granularity of software management for your organization.
To close the Software Installation snap-in:
  1. In the SIM Tool console, click Save on the Console menu.
  2. Click Exit on the Console menu.
To edit a Group Policy Object (GPO):
  1. Log on to the HQ-RES-DC-01 server as an administrator.
  2. Click Start, point to Programs, click Administrative Tools, and then click SIM Tool.
  3. In the SIM Tool console, double-click Active Directory Users and Computers, double-click reskit.com, and then double-click Accounts.
  4. Right-click Headquarters, and select Properties from the context menu. In the Headquarters Properties dialog box, click the Group Policy tab. Right-click HQ Policy in the Group Policy Object Links list box, and click Edit.
    This opens the Group Policy snap-in.
  5. In the Group Policy snap-in, under Computer Configuration node, double-click Software Settings.
  6. In the console tree, under the User Configuration node, double-click Software Settings.
You have opened the Software Installation snap-in for the HQ Policy GPO. Your snap-in should look like Figure 2 below.
Bb742421.instma02(en-us,TechNet.10).gif
Figure 2: Group Policy Snap-In
You can use the Software Settings node in the console tree under HQ Policy and Computer Configuration to assign an application to computers that are managed by this GPO. You use the Software Settings node under the User Configuration node to assign or publish an application to users who are managed by this GPO.

Configuring the Software Installation Defaults for a Group Policy Object

You can configure default settings for Software Installation on a per-Group Policy Object (GPO) basis.
To specify software installation defaults for the selected Group Policy object, you use the Software Installation Properties dialog box, shown below in Figure 3. This section explains some of the available options.
Bb742421.instma03(en-us,TechNet.10).gif
Figure 3: The Software Installation Properties page
Setting Options for New Packages and Installation User Interface
To control what happens when you add a new package to the selected GPO, you use the General tab in the Software Installation Properties dialog box, and set options in the New packages frame. The default behavior is that the Deploy Software dialog box appears each time, and the administrator can select one of the choices from that dialog box.
If you are going to deploy several packages to a GPO as published without transforms, you can select Publish in the New Packages frame, and every package that is deployed is automatically published. If you are going to add a package with a transform (customization or .mst file), you must select Advanced published or assigned.
Note: You cannot add or change transforms (.mst files) after the software is deployed.
This setting is most useful when an administrator is adding several applications at one time. For example, if an administrator is adding five applications to this GPO and they are all to be published with no transforms, then the administrator could set this to Publish.
Similarly, the options in the Installation user interface options frame allow the administrator to set how much of the user interface (UI) the Windows Installer presents to a user during installation. The Basic UI (the default option) only presents progress bars and messages; no user choices are presented other than Cancel. The Maximum UI option shows the UI that the author of the Windows Installer package defined.
Setting Options for Categories
When an organization has a large amount of software to manage, administrators can create categories for software. These categories can then be used to filter the software in the Add/Remove Programs in Control Panel. For example, you could create a category called Productivity Applications and include software such as word processing and database management applications.
Although there is a Categories tab on the Software installation Properties dialog box, categories are established on a per-domain basis. This means the domain administrator can create and edit the categories from any of the Software installation Properties pages for any GPO in the domain. Administrators can then use these categories with software they are managing within any GPO in the domain. There are no default or supplied categories.
Best Practice Because Categories are established per domain rather than per GPO, an organization should standardize the Categories and create them in a centralized manner.
To configure the default settings:
  1. In the Group Policy snap-in console tree, right-click Software installation under User Configuration, and then click Properties. This opens the Software Installation Properties dialog box. You use this dialog box to set defaults for software installation in the current GPO. You can set the default package location to the network location of the software distribution point you created earlier. Then you do not have to browse for each package that you add.
  2. In the Software installation Properties dialog box, click Browse.
    You need to browse for the software distribution point you created in the previous section relative to the network share location, rather than the local drive on the server. This ensures that you are managing software from the network share location that users can access. Users cannot access the package from the local drive of the server.
  3. In the Browse for Folder dialog box, click the plus sign (+) next to My Network Places, double-click Entire Network, double-click Microsoft Windows Network, and then double-click reskit.com.
  4. Double-click HQ-RES-DC-01, click Managed Applications, and then click OK.
    Note: The exact navigation above may differ on your network. Be sure that you are pointing to the software distribution point relative to the network rather than relative to the local drive on the server.
  5. In the Software Installation Properties dialog box, click the General tab, select the Display the Deploy Software dialog box (default) in the New Packages field, and select Basic (default) in the Installation user interface options field.
  6. In the Software installation Properties dialog box, click the Categories tab. Click Add.
  7. In the Enter new category dialog box, type Productivity Applications in the Category text box, and then click OK. In the Categories tab, click Add.
  8. In the Enter new category dialog box, type System Applications in the Category text box, and then click OK. Click OK.
Later, if you want to change these defaults or add additional categories for the organization, you can return to the Software installation Properties dialog box. As mentioned previously, categories are per-domain, not per GPO.
At this point you can either close the Software Installation snap-in or proceed with the scenarios described next.

الثلاثاء، 27 سبتمبر 2011

Installing iPhone 2.2 Software Update on iPod touch

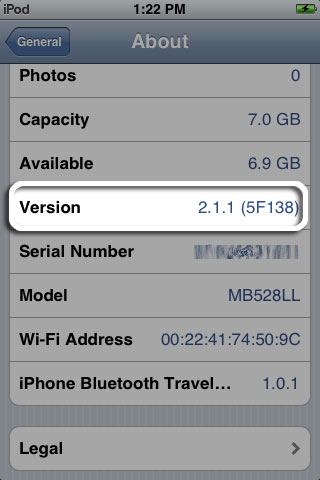
Here's how to check which software version is on your iPod touch:
  1. Tap Settings > General >About.
  2. The software version number appears next to Version.

If you have iPhone 2.0 software 2.0 or later, follow these steps to update your iPod touch software to the latest version:
  1. Make sure you are using iTunes 8 or later. Download iTunes.
  2. Connect your iPod touch to your computer.
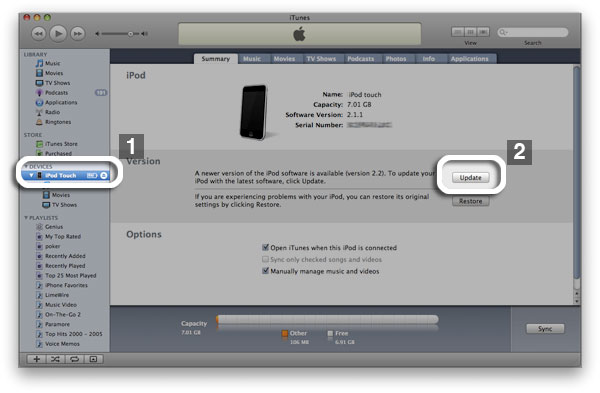
  3. When iTunes opens, select your iPod touch under Devices on the left side of the iTunes window (1) and in the iPod touch Summary pane, click Update (2).

  4.  iTunes tells you if there's a newer version of the iPod touch software available.
  5. Click Download and Install to obtain the latest version of software.

iOS: Device not recognized in iTunes for Windows

Symptoms

Your iPhone, iPad, or iPod touch may not appear under Devices in iTunes after you connect it to your Windows PC. Any of the following may also occur:
  • The device cannot be restored in iTunes.
  • An exclamation point, question mark, plug symbol, or "X" appears next to the device's entry in Device Manager.
  • During an update or restore, the device may no longer be recognized by iTunes.

1. Verify that Apple Mobile Device Support is installed

iOS devices require Apple Mobile Device Support, which should be automatically installed with iTunes. To verify whether it is installed, follow the steps appropriate for your Windows operating system below.
  • Windows XP: Click Start and choose Control Panel. Open the "Add or Remove Programs" control panel and verify that Apple Mobile Device Support is visible in the list of currently installed programs.
  • Windows Vista and Windows 7: Click Start and choose Control Panel. Click "Uninstall a program" (or if using Windows Vista's Classic View of the Control Panel, click "Programs and Features"). Verify that Apple Mobile Device Support is visible in the list of currently installed programs.
If Apple Mobile Device Support is not listed, remove iTunes, QuickTime, Apple Software Update, Apple Application Support, and then reinstall iTunes. Follow the steps appropriate for your Windows operating system below:


3. Verify that the Apple Mobile Device USB Driver is installed

For Windows XP:

  1. Connect the device to the computer.
  2. Quit iTunes if it launches.
  3. In the Start menu, right-click My Computer and choose Properties.
  4. Click the Hardware tab, then click the Device Manager button. The Device Manager window should open.
  5. Click the plus (+) icon next to Universal Serial Bus controllers to expand this selection.

  6. Locate the Apple Mobile Device USB Driver in this list. If this entry is displayed without any "x", "!" or "?" symbols over it, then this driver is successfully installed. Proceed to the next section titled "Check for third-party mobile phone software"
  • If the Apple Mobile Device USB Driver is not listed, proceed to the section below titled "If the Apple Mobile Device USB Driver is not listed".
  • If the Apple Mobile Device USB Driver is listed, but has a red "X" appearing next to the device's entry, this device is disabled. To enable this device, right-click its entry in Device Manager and choose Enable from the shortcut menu.
  • If the Apple Mobile Device USB Driver entry is listed, but has an exclamation mark or question mark over it, continue to the next steps to reinstall the Apple Mobile Device driver.

Reinstall the Apple Mobile Device Driver

  1. Right-click the Apple Mobile Device entry in Device Manager and choose Uninstall from the shortcut menu.
  2. In the resulting dialog box, click OK.
  3. In the Device Manager window, right-click Universal Serial Bus controllers and choose Scan for hardware changes from the shortcut menu.

Windows automatically reinstalls the necessary drivers and attempts to remount the device.
  • If the Apple Mobile Device USB Driver entry still has an exclamation mark or question mark over it, continue to the next steps to manually update the Apple Mobile Device driver.

Update the Apple Mobile Device Driver

  1. Right-click the Apple Mobile Device entry in Device Manager and choose Update Driver from the shortcut menu.
  2. If asked to connect to Windows Update to search for software, choose "No, not this time."
  3. Select "Install from a list or specific location (Advanced)" and click Next.
  4. Select "Don't search. I will choose the driver to install". Then click Next.
  5. Click the Have Disk button. Note: If the Have Disk option is not present, choose a device category such as Mobile Phone or Storage Device if listed, and click next. Then the Have Disk button should appear.
  6. Click the Browse button, then navigate to the following location: C:\Program Files\Common Files\Apple\Mobile Device Support\Drivers.
  7. Double-click the usbaapl file.
  8. Click OK in the Have Disk window. Then click Next. Click Finish. Windows installs the driver.
Note: During installation, if a message appears stating that the software you are installing "has not passed Windows Logo testing", click Continue Anyway to continue installing the drivers.


4. Check for third-party mobile phone software

Certain phone connectivity software from vendors such as Samsung, Nokia, Bora, Novatel, and Sony may cause your device not to be recognized. If you have such software on your computer:
  1. Uninstall your Samsung, Nokia, Bora, Novatel, or Sony phone connectivity software and test. Contact the manufacturer of this software for assistance in doing this.
  2. Remove iTunes and all related Apple software by following this article (for Windows XP), or this article (for Windows Vista and Windows 7).
  3. After reinstalling iTunes, test the device.
  4. If you still need your phone connectivity software that was removed, reinstall this software and test your device to ensure it still functions with iTunes. Contact the vendor of your phone connectivity software if the issue returns.

Create And Restore System Snapshots With Comodo Time Machine

An effective method of keeping a system clean is by reverting it to an original system snapshot regularly. Returnil can do that for instance. It loads a clone of the operating system that functions like the original system.
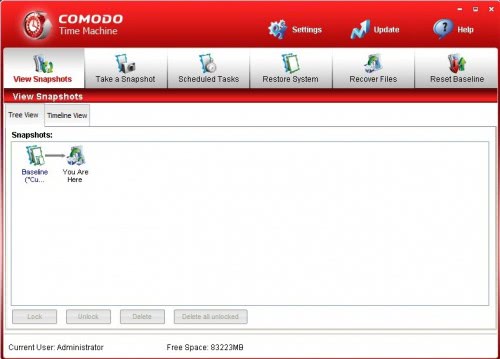
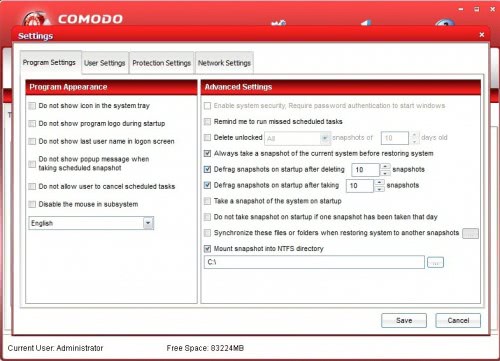
Comodo Time Machine is another software program that can create system snapshots and restore them if necessary. The system snapshot will create a copy of all files and settings of the hard drive Windows is running on. This includes Windows files, Registry settings, programs and documents and other files stored by the user.
The program will automatically take a system snapshot during installation which is called the baseline snapshot in the program. The program can create new snapshots automatically or on the user’s request with further options to delete previously taken snapshots (except for the baseline snapshot) to free up disk space.
Snapshots can be mounted right in the applications’s interface by right-clicking a snapshot and selecting the mount option. It is possible to mount the snapshot with full access rights or read-only rights. All files of the snapshot become then accessible in Windows like any other directory.
Files can also be recovered individually without mounting with the help of the Recover Files menu in the Time Machine application. This feature provides a file search option to search for files in the selected snapshot. This makes it rather complicated to use, a Windows Explorer like approach would be helpful here.
The creation and restoration of system snapshots can be scheduled in the application which offers several interesting possibilities. Public computer administrators can for instance schedule a restoration of a snapshot whenever the computer starts to ensure that data that has been tampered with won’t affect the system after a restart.
Users who have full disk encryption software programs installed will not be able to use Comodo Time Machine as it requires the uninstallation of those programs before it will commence the installation. That’s a rather strict and unfortunate rule that will likely turn away users from testing or using the program regularly.
Comodo Time Machine can be managed from the command line as well. Commands like taking or restoring a snapshot can be issued from the command line.
There is finally a so called sub console that is displayed during system startup if the user presses the Home key. This sub-console loads before Windows and offers the means to restore the system, take a snapshot, uninstall the program or compact the snapshots to save hard drive space.
Comodo Time Machine is compatible with most Microsoft operating systems including 32-bit and 64-bit editions of Windows Vista and Windows 7. Its features make it an interesting program for public computers, test systems, multi-user systems and computer systems where the user wants to be able to restore a previous snapshot in case of emergency. The recovery system that loads before Windows and the ability to schedule snapshots make Comodo Time Machine a clever product for that purpose. Only the incompatibility with file encryption software like True-Crypt put a dent in the otherwise interesting program.

Taking Registry Snapshots

Taking Windows Registry snapshots can be a way to analyze changes that have been made to the system during a set period of time. The time being of course the days, hours or minutes between the first and second snapshot.
Regshot is a software that is able to take Windows Registry snapshots and compare two of the snapshots that have been taken. Results can be displayed as a text or html document making it easy to find out what has been changed because only the modifications that have been discovered are listed.
It is possible to add directories as well that will also be checked for modifications. An add-on called UnDoReg makes it even possible to undo all the changes to the registry by simply loading the generated text report.
take registry snapshots
Read More:
Regshot
UnDoReg

Software Installation Monitor

Many software programs have to be installed on a computer system before they can be used. The installation itself is not a transparent process because the user is not informed about the Registry and file changes that the installer initiates. Most users would probably skip those information anyway but monitoring software installations is a reliable way of determining if a software program is making changes to a computer system that it should not.
SpyMe Tools is a software program that can monitor both file and registry changes caused by software installations. This is done by creating snapshots before and after the software installation. These snapshots are then compared to each other and the differences are shown to the user. The program does require some manual work before it can be used effectively. The first step is to create a snapshot of the Windows Registry before the software installation.
After that it is necessary to switch to file mode and select the hard drives that should be monitored for changes. This usually includes the partition with the Windows operating system and the partition that the software gets installed to. The program will create another snapshot of the hard drives which also has to be saved to the local hard drive.
After both snapshots have been created start the software installation normally. Once the software installation has been completed run a second scan of both the file system and Windows Registry. A click on the Compare button makes it then possible to compare both snapshots with each other to display the changes to both the file system and the Windows Registry that the installation has caused.
software installation
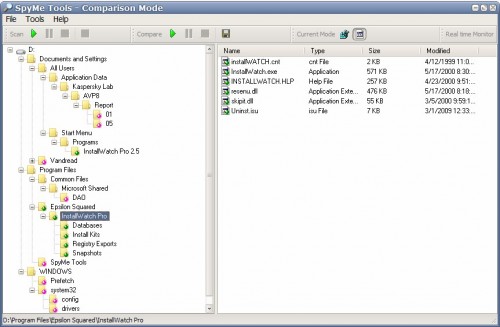
The software installation monitor will display the information in a tree like view in the left window of the software program. If you compare the file system it will list all folders that have been changed in the file system since the creation of the first and second snapshot. The right window will contain the actual file information including name, type and size.
SpyMe Tools are also providing access to a real time monitor that can either monitor the Windows Registry or the file system in specified locations. The real time mode is a bit harder to work with as all changes will be listed in one quickly growing table.

Liquesce, Windows Drive Pooling Software

 Drive pooling describes a technique where multiple hard drives, partitions or folders of drives are merged together to become available as one larger virtual drive. Say you have your media on a drive with one Terabyte. When that drive fills up, you have a few options at hand. You buy a new drive when you do not want to delete data on the drive. You can connect the new drive to the computer and use it from that moment on for media storage, you can also move the files from the old drive to the new one and disconnect the old drive afterwards, or you could pool the drives together to end up with a single drive with 4 Terabytes of space.
Every solution has its advantages and disadvantages. If you keep the drives separated you may face management problems as the drives are addressed with different drive letters. Getting rid of the smaller drive reduces the total size of the available storage by the drive’s size. Merging both drives with a drive pooling solution like Liquesce, or the previously reviewed Drive Bender finally is the best option for manageability of data.
Liquesce is a free software for Windows that works in many regards like the Drive Extender functionality in WHS. The program is compatible with hard drives of any type and size, provided that they are accessible under Windows. This includes SATA, IDE, Firewire and ESATA hard drives. Please note that Liquesce requires the installation of the Windows file system library Dokan which can be downloaded here. The installer will throw an error if Dokan is not installed on the system.
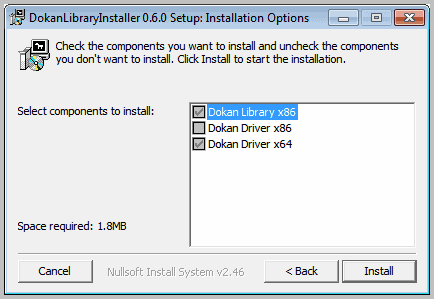
Make sure you install the right driver during installation. Dokan can install 32-bit and 64-bit system drivers which are both included in the installer.
dokan installer
A restart of the system is required before you can install the Liquesce software. The management interface is automatically started after a successful installation. This management window is divided into the three areas file system, merge points and expected output.
management-window
The file system displays all connected drives and their folder structure. It is possible to drag and drop drive letters or folders to the merge points area. Merge points combines all folders, partitions and drives that you want to merge into a virtual drive letter. You can reorder the the selected items which is important as it determines the order for filling the resulting storage.
The expected output pane finally shows how the virtual drive will look like if you create it right now. You will see duplicate file names and stuff like that to make you aware of problems before the new drive is created.
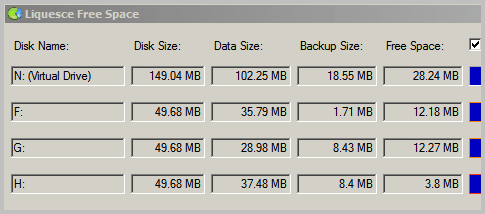
The tray app offers information about the disk and free space sizes of the virtual drive and all drives used to make that drive.
free-disk-space
And that’s basically it. You can use the new virtual drive like any other drive on the system.
It has to be noted that Liquesce is currently offered as an alpha release, which suggests that it should not be used in a productive environment, at least not without extensive testing before deployment.
New users should look at the release notes and documentation of the drive pooling software before they start the installation to make sure they get it right the first time.
The next steps coming up are detailed in the documentation as well. This includes an installer that automatically checks for missing components, the ability for more than one spanning drive and a better management application.
Windows users interested in the project find downloads and documentation on the developer website